
The Layers Panel
In the Layers panel, you will find multiple options, or layers (as they are called by GIMP) available. Think of a layer as a piece of an image. If the image was laid horizontally, you could theoretically stack things on top of the image. Each thing you stacked would be its own separate layer.
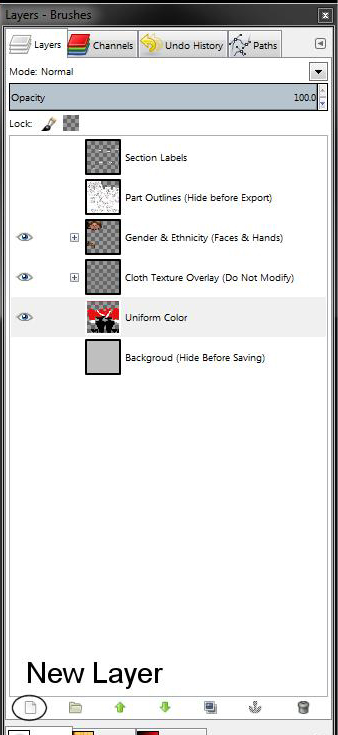
Layers can be nested, or grouped under other layers. The order of layers is important, as much like in real life, if you stack a larger object on top of a smaller object, you will no longer see the smaller object. The same can be said with the layers of an image. If, for example, the sash on your uniform was on its own separate layer from the uniform coat, and ordered under the uniform coat layer, the sash would not be visible. With that being said, the following layers are available in the template file from top (highest) to bottom (lowest):
- Section Labels
This layer, when visible, will display the name of each piece of the uniform that can be edited. The Section Labels layer corresponds with the next layer below it, the Part Outlines. This layer should be hidden before saving the image file. - Part Outlines
This layer, when visible, displays the outlines for the uniform. When creating a custom uniform, you only need to color inside the boundaries of this layer, as anything beyond the outlines will not be represented on the performers. Think of it as coloring inside the lines of a coloring book. This layer should be hidden before saving the image file. - Gender & Ethnicity (Face & Hands)
The Gender & Ethnicity layer is a group of layers that contain options for different ethnicities for the performers. To change the ethnicity of the performers, click the visibility (eye) icon to turn off the current skin, and click in the same area to turn on the visibility on the ethnicity layer you wish to use. You may need to expand the list to view the available layers. - Cloth Texture Overlay
This layer contains an overlay to add a sense of realism to the uniform. You should not need to edit anything in this layer. - Uniform Color
The Uniform Color layer shows the current template uniform. You will be creating a new layer just like this one when designing your custom uniform. - Background
The Background layer is available should you want to have a color behind the uniform. This layer should be hidden before saving the image file.
Create a New Layer
You’ll want to create a new layer when working on your uniform, otherwise you’ll overwrite the template. To create a new layer, click the New Layer button.
A new window will appear. Give the layer a name, then press OK.

You’ll see your newly created layer in the Layers panel. As we discussed earlier, the order of layers in the Layers panel is important. Be sure that your new layer is between the Cloth Texture Overlay and Uniform Color layers. Whenever you’re designing the custom uniform, you will want to be sure that this new layer is selected for editing. Again, you do not want to edit the template layer!
Click through to the next topic, Select Paths to Edit, to continue.
Post your comment on this topic.