
The Free Form tool allows you to draw freely without the restriction of a certain shape. This tool would be most similar to a paintbrush/pencil/pen tool of graphic design applications.
For NEW performers, set the Red and Yellow Anchors on the Count Track to the count at which you wish the free form shape to be drawn. To transition EXISTING performers into a free form shape, move the Red Anchor to the count where the selected performers should “hit” the free form shape. Move the Yellow Anchor to the beginning count of the transition into the new shape. This is usually the previous set in the drill. Select the existing performers that will be moving into the free form shape using a Selection Tool. See the Drawing Tools overview for more explanation between new performers and transitioning existing performers.

Clicking on the Free Form tool will display the Free Form Control Panel.

Drawing a Free Form Shape
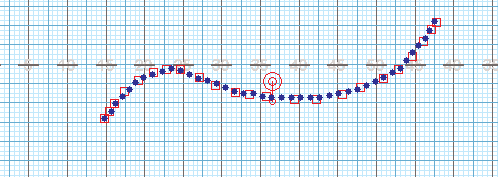
The free form is drawn by clicking points on the field display. The first click on the field is the first endpoint of the free form. The second click on the field places an editing handle at the second point of the free form shape. By continuing to click on the field you add more editing handles that extend the shape.
You could also draw a free form shape by continuously holding the mouse button while moving the mouse across the field.
Free Form Tool Control Panel Options
Edit Handle Spacing allows you to adjust the frequency that new editing handles (red box) are added to a shape while drawing. For example, if you enter “2” the in Edit Handle Spacing box, while using the Free Form tool, an edit handle will appear every two yards on the shape you create.
The Del Last button is used to remove the last entered point when creating the free form.
The Del Half button is used to halve the number of points entered by deleting every other point entered on the field. This is useful if you have too many points to form a smooth shape.
Entering the interval in the Interval box will lock the interval and the form will maintain the interval while you move its editing handles. Since the interval between positions is locked, the form would grow or shrink by changing the number of positions in the form.
Mixed Intervals are also entered by pressing the ![]() button. This option will allow you to have different intervals in one form. Mixed Intervals are extremely useful when charting large instruments or instruments that are close together but vary in size (drum lines, for example).
button. This option will allow you to have different intervals in one form. Mixed Intervals are extremely useful when charting large instruments or instruments that are close together but vary in size (drum lines, for example).
To create a Mixed Interval, type the Interval value, followed by an “x”, followed by the number of positions at that interval. For example, a form with 5 positions at a 3 step interval, followed by 10 positions at a 2 step interval, ending with 5 positions at a 3 step interval would be entered like this:
5×3,10×2,5×3
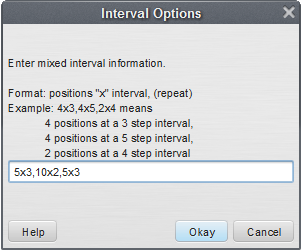
Mixed Intervals can be entered before or after you create your shape, but must be entered before you Accept the form.
Many of the options in the Free Form Tool Control Panel are exactly the same as options in the Line tool. Refer to the Line tool for details on the Clone, Alignment, Symbol, Color, Editing Handles, and Reposition Handles. See Matching Lines for an explanation of the Matching Lines functions.
Post your comment on this topic.