
A Prop is an image of an inanimate object such as a stage, wall, pillar, fence, etc. Any .jpg, .gif, or .png file can be used as the prop. All props are entered at count 0 of the drill. Props can be move around the field independently or be moved by a performer.
Before entering a prop, place both Red and Yellow Anchors on the Count Track to count 0 of the drill. This enables the Prop tool. Props are always added at count 0.

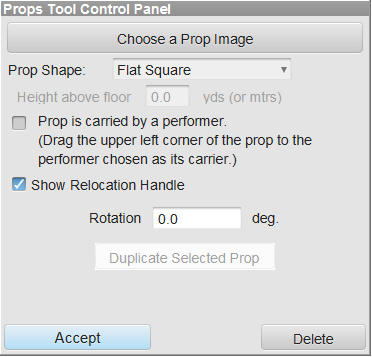
Clicking on the Prop tool will display the Prop Tool Control Panel.
Clicking on top of an existing prop will select the prop for editing. A prop is selected when it is outlined in red.
Clicking a location anywhere else on the field will start the creation of a NEW prop. The first click will be the location of the upper left corner of the prop. Move the cursor to the location for the lower right corner of the prop and click. A red box will indicate the location entered.
Editing handles will appear on a selected prop. Dragging the handle in the upper left corner will move the location of the prop. Dragging the handle in the lower right corner will change the size of the prop.
Choose a Prop Image in the Prop Tool Control Panel will display a file dialog for finding an existing image to assign to the prop.
Prop Shape will assign an existing shape to the prop on the field. these range from flat panels and polygons to pit (front ensemble) setups.

Prop is carried by a performer will cause the prop to move with the movement of a selected performer. To select the performer to be the prop carrier, drag the upper left corner of the prop directly on top of an existing performer. A red “bulls eye” will appear on top of the performer to indicate the performer will carry the prop throughout the drill. The carrier can be any performer in the drill, whether they are a wind/guard/drum line member, or just a performer who’s sole purpose to move the prop. Selecting the performer and editing its movement throughout the drill will cause the prop to move as well.

To rotate a prop, select the prop and adjust the Reposition Handle. Alternatively, you can enter a value in the “Rotation” box in the control panel. Positive numbers will rotate the prop clockwise, and negative numbers will rotate the prop counter clockwise.
The height of the prop can be entered by entering a number in the Height box. The height is in yards or meters.
To delete a prop, set your anchors on the Count Track to count zero. Open the Prop tool and select the prop by clicking on it. In the Props Tool Control Panel, press Delete, then Accept to accept the change.
Should you transfer the drill file to another computer, you will need to also transfer the prop images used in your drill. You can save a 3D Drill file as a 3D Package that will include all props used with the drill into one file. When saving, the package option Include Props must be set. To change the format of an existing drill file to a 3D Package, choose Save As from the File menu.
Post your comment on this topic.